Hi friends, welcome to another gardening article ! It is actually quite beautiful today because it’s been miserable for the past month. It’s been raining nonstop, and some of my plants are starting to rot because the soil doesn’t have a chance to dry out. So I’m a little bit concerned, especially for my spring bulbs. But today, we are going to be planting some new plants on my balcony, and I wanted to share with you what I’m going to be planting as an idea, as an inspiration.
I have two beautiful climbers because I’m always trying to add more vertical interest to my balcony. A balcony or terrace is not only the floor space available but also all of that vertical space, so it’s always a good idea to use the balcony to its full potential by also using that vertical space. All of these plants that I’m going to be showing you today can be grown both on a shady balcony and on a sunny balcony, so that’s really awesome!
I’ve had the bench for a while now, and what I’m thinking of doing is placing two beautiful large containers on each side of the bench. I actually bought some containers.I recently bought these two pots, and I’m super happy with them because I wanted pots like these for a while. Terracotta pots that look like this and are of this size can be really expensive, so I was searching for some plastic alternatives. The idea is to place these two pots on each side of the bench and then grow two climbers in these pots. I want the climbers to go up the wall and create sort of an arch and join each other in the center. Both of these climbers will bloom at the same time, so I think that would be like a really beautiful floral arch. I think that would look really cute.
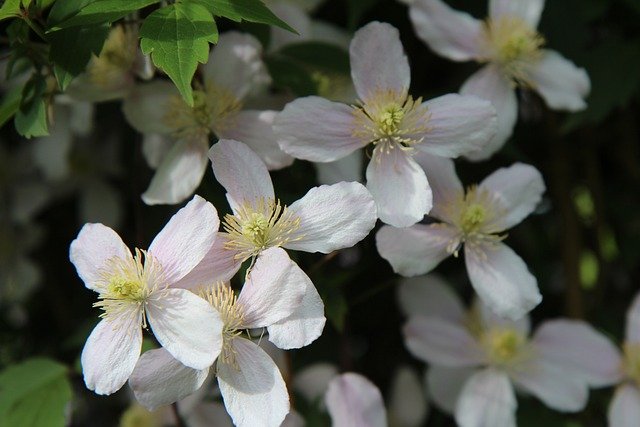
Okay, so my first climber that I’m going to be planting today and that I want to grow next to the bench is Clematis jackmanii. If you don’t have a clematis on your balcony yet, I highly encourage you to add it to your wish list because they are just so beautiful! I think that no other climber can compete with clematises in terms of diversity and adaptability. You can find a clematis as small as 90 cm tall or as large as 8 to 10 meters tall and anything in between. So no matter how large or small your balcony garden is, you can find a clematis that will be size-appropriate for your space. They come in so many different colors, bloom sizes, and shapes. You can find clematis with large flowers, small flowers, single blooms, and double blooms, bell-shaped flowers, some scented and some not.

We have clematis that bloom at many different times of the year: spring, summer, autumn, and winter. Some have deciduous foliage, some have evergreen foliage, and some are not even climbing at all but are really compact, like bush or shrub-shaped. Honestly, anyone can find a clematis they like, and they can be grown both in the shade and in the sun. They are a really beautiful, diverse group of plants that are very adaptable and grow really well in containers. If you don’t have a clematis on your balcony yet, I highly encourage you to consider getting one for yourself. When they bloom, they put on such a beautiful flower show that is just a pure joy and pleasure to watch. I don’t know why I haven’t planted more clematises until now! I have only one on my balcony, and I’m completely obsessed with them and want to grow more now.
I have a Clematis montana ‘Mayleen’ that is back there. It is a spring-flowering clematis, a really large clematis that grows 8 to 10 meters tall. This one, Clematis jackmanii, is way smaller, growing anywhere from 2.5 to 4 meters tall. Montana is a spring-flowering clematis, and jackmanii is a summer-flowering clematis, so the idea is that once Montana is done, jackmanii picks up, and we have that continuation of a beautiful flower show. It is a summer-flowering clematis, a large-flowered clematis with single blooms and purple flowers, a really beautiful clematis.
Now let me show you the other climber! I have this grouping of pots here with one obelisk and ivy climbing on top of it. I would like to add one more obelisk, but a little bit larger, here where I currently have the begonia. I want to add one large obelisk and grow another climbing plant on top of it. My second climber that I’m going to be growing in this area is this one. I know it doesn’t look like much; I was actually really disappointed when I received this plant because there was not a single healthy leaf on it. Upon closer inspection, I realized that it had red spider mites. I contacted the vendor, and they gave me my money back, but still, it’s a little disappointing when you are excited about a plant and then receive it in terrible condition.

I haven’t done anything about the spider mites for now because spider mites can be really dangerous and reproduce really fast, but to reproduce fast, they need really warm and dry conditions. It’s very cold outside, and it’s really rainy and humid, so I think the weather conditions themselves will prevent them from reproducing and spreading in the garden. I will keep an eye on them and see what happens in the spring.
Here we have Passion Flower – Passiflora ‘Eia Popeia,’ a really interesting cultivar because it is a hybrid between a really ornamental passion flower and a fruiting passion flower. You get the best of both worlds with this beautiful ornamental passion flower that produces large, beautiful pinky-mauve flowers and the possibility of producing really tasty fruit. To produce fruit, you need another passion flower to cross-pollinate, which I don’t have for now, but I’ll keep that in mind. How cool would it be to grow your own passion fruit on your balcony
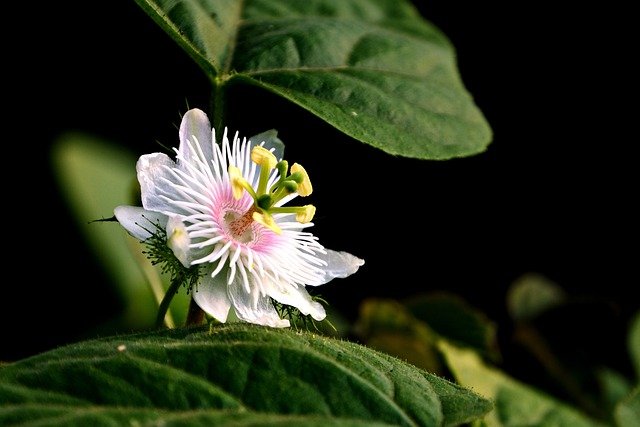
It can be grown in part shade or full sun. If you grow it only as an ornamental plant, you can plant it in the shade. But if you want fruit production, you will need at least a couple of hours of sunlight for the fruit to ripen. I couldn’t find a lot of information about this plant online, only the website where I bought it and the breeder’s website. The breeder is from Switzerland, and they say this plant is a great performer that can produce many flowers. The flowers themselves don’t last very long, but the plant can produce a lot of flowers, so you can still enjoy blooms all throughout summer from June to September. In autumn, the plant normally sets fruit.
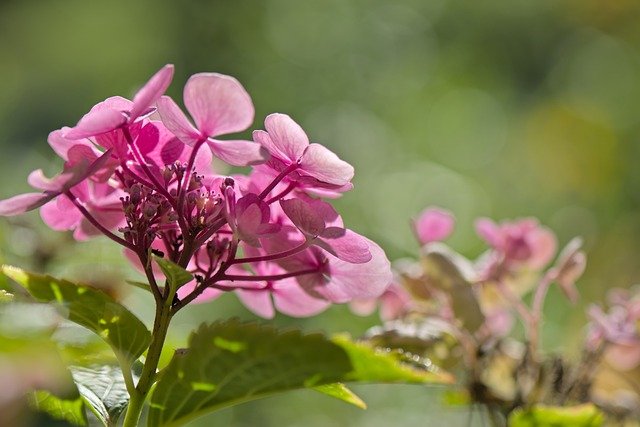
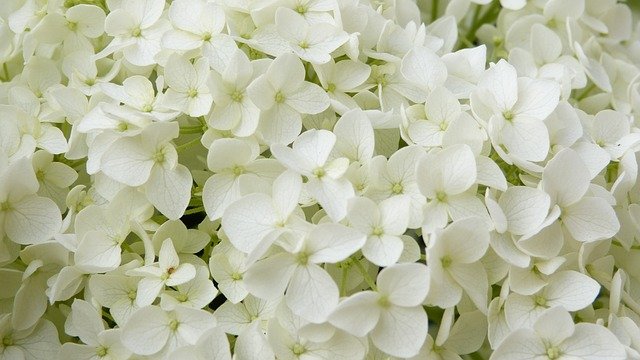
Okay, the last plant that I want to show you today is this hydrangea, but this is not just any hydrangea. This one is pretty special, and I’m super excited to grow it. I think many of you might be interested in growing this plant as well.This is Hydrangea arborescens, specifically the Annabelle type hydrangeas.Annabelles are really large and floppy; you will always find them lying flat on the floor, which doesn’t look very attractive because they have massive flower heads and very weak stems. Even the improved Annabelle, the ‘Incrediball,’ is still, in my opinion, too large to be grown in containers. If you have a large balcony and a large container, then sure, you can plant them, but I think for most balcony gardens, they will be a little bit too large.
Here comes the BellaRagazza series, the smallest Annabelle-type hydrangeas in the world. They only grow about 65 cm tall and wide. In that BellaRagazza series, we have three hydrangeas: Limetta, which is chartreuse green; Blanchetta, which is all white (the one I picked); and Mouvette. Hydrangea arborescens is very adaptable and can be grown both in full sun and full shade. They are always recommended for full shade gardens, as are the big-leaf hydrangeas (Hydrangea macrophylla). The problem with Hydrangea macrophylla is that they bloom on old wood, producing flower buds on the branches they grew in the previous year. If you prune it at the wrong time of the year, you are cutting off potential blooms.
With Hydrangea arborescens, these bloom on new wood, so if you prune it in the fall or spring, it will still produce new stems and flowers.They are beginner-friendly because even if you prune them at the wrong time of the year, they will most likely still bloom. They are super dwarf, perfect for balcony gardens, beginner-friendly, and can be grown both in the sun and shade. I’m really excited to grow this one!
Now let’s plant all of these plants! Let’s start with the clematis. One thing I want to address quickly is the size difference between the containers. The nursery pot is small compared to this one, and you know we always say not to plant plants in too large of a container because the small plant with a small root system can be surrounded by wet potting mix and may rot. But clematises grow so rapidly that I prefer planting them in their final container right from the start than to repot them every couple of months. In the fall, I will place it next to the wall where there’s a rain shadow to avoid excess moisture, but in the spring, once the plant starts actively growing, it will be no issue.
I’m going to plant it in a potting soil mix that contains actual garden soil, sometimes called loam-based compost or loam-based potting mix, like
Multi-purpose potting mix is great, too, but for trees, shrubs, and climbers, it’s better to plant them in potting soil with actual garden soil. Normally, I would use a whole bunch of compost, but I can’t find it for sale at garden centers now. I always stock up in summer, but I’ve used all my compost. I’m using just potting soil, and in the spring, I will scrape the top layer and replace it with compost. There’s a drainage hole at the bottom, and I’m not putting any extra layer of gravel; that’s unnecessary when you have drainage holes.
Whenever I plant something in a large container, I place the pot inside the pot, take it out, pop the plant out, and you have a perfect hole for planting. Look at this earthworm! People always ask how I have so many earthworms. They come with plants and stay on the balcony. They reproduce because I add a lot of organic matter and organic fertilizers, so they like it here. I’m just going to tease the roots a little and pop it in the hole.
For now, I’m leaving the bamboo stick in here. In the spring, I may buy some smaller containers of the same type to make a cute grouping. I’ll water it in a moment. The exact same process for the Passiflora. Just going to pop it out, another worm—lovely. This is not very pot-bound, so it can go directly. For now, I put the plant in the corner because it doesn’t look very attractive, and the begonia here is still looking pretty, so for now, it’s going to stay there.
Okay, now time for the hydrangea. I thought I had a larger pot available, but this is my largest pot. I’m going to repot it temporarily into this pot because I still prefer to repot it now rather than overwinter it in its plastic pot. In the spring, I’ll plant it into a larger pot because it will eventually need a slightly larger pot than this one. With hydrangeas, you can repot them either into soil-based potting mix like we did with the other climbers or into ericaceous potting mix. They do well in slightly acidic soil, so I’m going to repot mine into ericaceous potting mix. Another earthworm! There’s actually more of them—it’s my lucky day, introducing more soil life to my balcony.
Okay, you guys, this is going to be it for today’s article. I hope you enjoyed it! Thank you so much for reading, and we’ll see each other again next article. Bye!