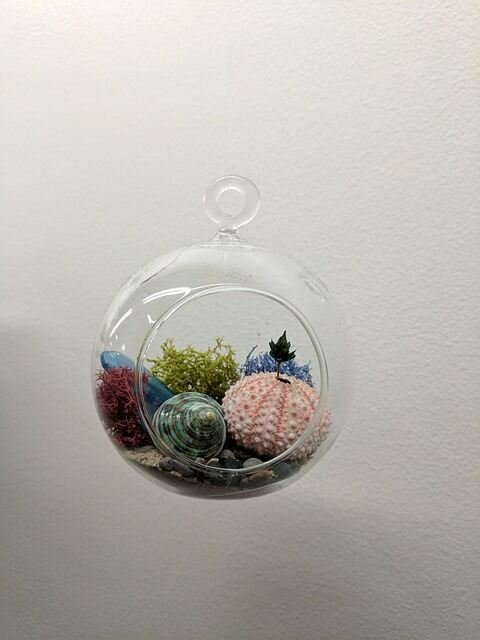
Choosing a container, making a terrarium can seem difficult and complicated if you’ve never made one before. But afterreading this, you’ll learn exactly how to make your own. I’ll be covering everything from making the drainage layer, creating the substrate mix, picking out the right moss and plants, and much more. I’m going to start by picking out an appropriate container to build the terrarium in. Although all of these would make great terrariums, some will be a lot harder than others. This glass bottle, for instance, has a very tight, narrow opening. This makes it difficult to get any materials inside. That’s not to say it can’t be done, and long tweezers such as these will make the job possible, but it’s definitely a lot harder and can most certainly test your patience. So for today’s build, we’re going to pass on these two containers here. Micro terrariums in glass bottles such as this one can be great fun to make; however, they can be quite fiddly and do require a little more maintenance for them to thrive. This is a glass spice jar. Making a terrarium in something like this is a great budget-friendly way to upcycle otherwise useless household items. Another great option to use is something like a drinking glass. They’re very affordable and come in lots of different shapes and sizes. However, unlike this jar, they obviously don’t come with a lid. This is a quick and easy solve by using something like a clear acrylic disc. They’re very affordable and make great lids for terrariums. Here’s a drinking glass terrarium I made six months ago, and as you can see, it’s thriving. Although it would work great, I want to use something a little larger for today’s beginner build. These three containers here would all make great terrariums. They all come with a lid, they’re easy to get materials inside, and they’re a good size to start off with. For today’s build, I’m going to be using this glass cookie jar. I got it from Ikea, and it’s roughly two liters in size. It has a lid with a rubber gasket, which will provide a tight seal. One important thing to point out before starting this build is the glass seam. Although it’s hard to see on camera, this is a line that goes down either side of the glass. Make sure you position these lines on the side so they don’t block the front.
Making the drainage layer, view now. I’m going to move on and start making the drainage layer. This is a layer of stones or rocks that will sit at the bottom of the terrarium where excess water can sit. To make this layer, you have many options. This is pea gravel. It’s very affordable and can be found at most garden centers and hardware stores. This is leca. It’s a little more pricey, but it has the added benefit of being extremely light and porous. The most budget-friendly way is to simply find stones outside. Although all three of these would work great for today’s build, I’m going to be using leca. As I briefly mentioned earlier, it’s very porous. This means each stone will be able to hold water, which will ultimately mean that there is a greater volume of drainage in the terrarium. It’s also very light, which will keep the weight of the terrarium down. This comes in very handy in large terrariums. After pouring in a generous amount and patting it down into place, the drainage layer is complete. For a terrarium this size, the drainage layer only needs to be about two to three centimeters. If I was to put the substrate in now, it would fall through all the gaps and cracks in the drainage layer. This is certainly not ideal, but there’s a simple solution.
I’m going to use window screen mesh to create a substrate barrier. This will sit on top of the drainage layer and prevent the substrate from getting through. Obviously, it needs to be cut to size, which can easily be done with a pair of scissors. I placed the terrarium on top of the window screen mesh and then roughly cut out the shape. Then I take it and neaten it up a little bit. There are other materials you can use for a substrate barrier, such as weed blocker fabric, but I found window screen mesh to work best. It holds the majority of the substrate back while still allowing a good flow of water. It hasn’t got to be perfect and can even work better if it’s cut a little bit too big. The substrate will have a hard time getting through the small holes with the substrate barrier in place.
Making the substrate mix, leakage layer, and substrate deterrent set up, could we forge ahead to making the substrate mix. I will use my normal mix, which I’ve used to make more than 2,000 productive terrariums. These are the materials you’ll require.I’ll understand the degree as I make the blend. You’ll similarly require a tub to work everything up and a tub to measure the parts. We ought to start. I will start by taking the cocoa fiber block and rehydrating it in water.Be aware that it does expand a lot. About 20 minutes later, it’s fully hydrated and ready to add to the mix. I use the cup to measure out one part cocoa fiber. One part is simply whatever size cup you are using. One quarter part will be one quarter of the cup, and two parts would be two cups. Obviously, as I mentioned, we only need one part cocoa fiber. I’m then going to measure out two parts sphagnum moss. As I make a lot of small terrariums, I like to trim up the sphagnum moss into small pieces. This is easily done with scissors. I then add a quarter part of orchid bark, a quarter part of charcoal, and a quarter part of worm castings. Then I mix them all together. Here’s all the ratios up on screen if you want to take a screenshot. All the components come together to make the perfect terrarium substrate. It holds moisture, it’s resistant to compression, contains nutrients for the plants, and is well-draining. These are all key characteristics of a quality terrarium substrate. If you’re like me and make a lot of terrariums, why not make a big batch? Time to get the substrate into the terrarium. I use a cup to pour in a generous amount of substrate. If you’re enjoying this build or finding it useful, why not drop a like and subscribe so you don’t miss any future builds? Once I had a decent amount of substrate in, I used the back of my hand to gently pat it down into place. As you can see, I’ve created a slope that goes up towards the back of the terrarium. This is a straightforward and simple way that will assist with working on the feeling of profundity. Likewise, while taking a gander at the substrate obstruction, you can see that it’s working effectively at preventing the substrate from getting into the waste layer.
Terrarium hardscape, time to move on to my favorite part, which is the hardscape. When it comes to hardscape, there’s pretty much endless options which you can choose from.
Here are a few of my favorites. This is dragonstone. It’s a very popular hardscape to use, and I can see why. Lava rock is also a very popular option, and you can get it in a black and red variety. Seiryu stone can also look great in terrariums and creates a nice contrast to green moss and plants. Although I don’t use them much, granite pebbles create some nice textures and details. A super cheap but effective option is slate stone. It has really nice horizontal textures in each piece. Spiderwood can no doubt completely transform the hardscape of a terrarium and comes in a huge variety. Driftwood can also look great on its own or in combination with rocks and stones. And last but not least is cork bark. It’s a budget-friendly hardscape which looks great inside terrariums. There are plenty more options that I haven’t listed here, and if you’re on a budget, you can even go outside and find your own hardscape. For today’s build, I’m going to use spiderwood in combination with slate stone. I think the gray of the slate stone will contrast nicely with the brown of the wood. Instead of just putting some stones in and calling it there, I take some time to experiment with different layouts and structures until I find something that I’m happy with. Here’s what I came up with. It’s a very simple layout that incorporates three pieces of slate stone and one piece of spiderwood. I think this is a nice, simple skeleton that can be brought to life with moss and plants. I’m going to take the spiderwood out for now so planting is a little easier.
Picking the greenery, presently about greenery. Prior to picking one, I will show you three extraordinary choices that all work perfectly inside terrariums. This one here is greenery. It’s one of my #1 animal categories to use in terrariums. It truly gives the terrarium a profound, foresty look, which I love. The main drawback is in low light circumstances, it can become very leggy and loosened up. This is pad greenery. An energetic green types of greenery loves to develop inside terrariums. It’s an extremely sluggish developing types of greenery, as should be visible in this half year old terrarium. This isn’t really a negative, as it implies less support will be required. This here is state of mind greenery. It’s basically the same as pad greenery, just it becomes quicker. This terrarium needs a spotless and a light splash, yet the state of mind greenery has worked effectively developing inside here.All of the three of these plants will work impeccably, but for the current structure, I will use cushion vegetation. I start by filtering through the plant life, wiping out any sticks and twigs inside. I then, use my hands to delicately tear the plant life into additional unobtrusive pieces. Then, I will take a few scissors and cut off the foundation of the greenery. This won’t hurt the vegetation in any way shape or form and will allow it to sit closer to the substrate, which will achieve a prevalent looking terrarium. Quick tip: the base portion can be used as a substitute for sphagnum plant life in a terrarium substrate mix. I will utilize a few long tweezers to establish the greenery inside the terrarium. They’re not fundamental yet are assuredly useful. I’ll place a connection in the depiction to a comparative pair to these. When the greenery was in, I utilized my finger to delicately squeeze it down onto the substrate. This will assist it wick up dampness from the substrate with layering, which will support its development.
Planting the plants, with the plants in, it’s time to move on to the next step. These are springtails. They’ll help make the terrarium a true miniature ecosystem. They’ll do this by eating any mold or decaying matter that they can find. They then process it and poop it out in the form of fertilizer for the plants. In return, the plants and moss provide sufficient oxygen for them to survive. You can find springtails in most reptile and amphibian shops, but you can also get them online. If you really wanted to, you can also find them outside under damp leaf litter. Time to move on to watering. This step is very important and is often where people go wrong. I like to use a small misting bottle and give the entire terrarium a light spray down. It’s very important that you don’t overwater the terrarium. In most cases, you should stop watering before you think the terrarium’s got enough water. Remember, it’s much better to underwater a terrarium than overwater it. When looking at the substrate, it should be damp and not wet or soggy. As this terrarium has a seal on the lid, very little moisture will be able to leave the jar. This means it will need very infrequent watering. I won’t be looking to water this terrarium for at least a year. When it comes to lighting, you have a few options. You can either get a display LED light, such as this one, and turn it on for 12 hours and off for 12 hours. Alternatively, you can place it in a bright spot in indirect sunlight. Just make sure you avoid direct sun. A good care practice to get in the routine of is to open the terrarium every one to two weeks. This will let some fresh air in and give you the opportunity to check up on its overall health.