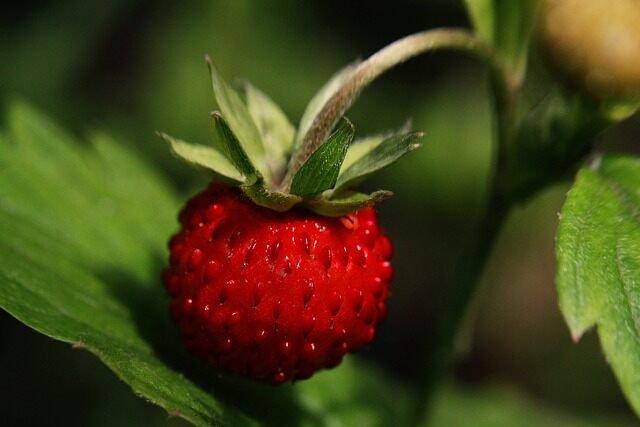
One of our favorite fruits and a crop that just screams summertime, especially here in the north, is strawberries. Luscious red globes of amazing flavor. Everyone loves strawberries, and in that rare instance when the planets align for us gardeners, we get lucky because strawberries are also super easy to grow. They’re not foolproof, however, and there are a couple of hard rules that we need to observe when we’re growing strawberries at home. Not complicated and nothing we can’t handle, but to grow the biggest and best and most strawberries that you’ve ever grown, the plants do need a few things from us first, and we’ll cover all of that stuff today, the definitive guide to growing your own strawberries right at home.
I’ve got these guys planted everywhere, and I’ve grown strawberries for as long as I can remember. So sit back and relax, spring is here! Yes, but we’ve got plenty of time to get our berry patches going.
Strawberries are a cool climate crop, tolerating sub-zero winters and up to 85 to 90-degree Fahrenheit summers. The optimal range for these guys, however, is between 60 and 80 degrees Fahrenheit, making them the perfect berry crop for zones 5 to 10. No matter where you live, strawberry plants do need protection. They need protection from the frost in the winter and they need protection from the overbearing heat of the summer, but we’ll get to those things a little bit later.
Strawberry plants have extremely shallow root systems, and as such, they’re suitable for both raised beds and container gardening. They’re nothing if not versatile. There’s one thing, though, that you can’t compromise on when you’re growing strawberries, and that’s drainage. Although they like it consistently moist, wet, soggy, or anaerobic conditions can prove fatal for strawberries. The best soil is a loose sandy loam that’s high in organic matter. They soak up the nutrients like crazy, so amending your soil with compost is one of the best things you can do. pH neutral or slightly acidic is also ideal.
Strawberry plants do like full sun, but as a low-crawling type of plant, they’re not too fond of high winds. Their relatively large pomade leaves are tough, yes, but they can desiccate under extreme wind and heat. And you know what? Soak in the fruit. And when that happens, they become tough and not nearly as desirable to eat. So if you’re growing on an exposed patio or deck like I do with some of my strawberries, give them some protection from the high winds and heat, either from a railing, your house, or even other plants. Quickly, back to that moisture for just a sec. Strawberries are a berry-producing woodland plant by nature. They love a moist soil but not soaking wet and certainly not standing in water. Like we said, good drainage is going to serve them well.
I know it seems like a long list of requirements when you lay it all out like that, but really it’s typical of most crops. Whenever you have a plant fail or perform poorly, it’s always wise to go back and look at the requirements, see what you could have done differently.
Alright, if you’re just beginning and you’re trying to get them going for the first time, strawberry plants can be started in three different ways. First up, strawberry plants sprout and grow readily from seed. Also, the plants themselves send out runners known as stolons when they reach their second year of growth. These are essentially satellite daughter plants, and they can be cut off and grown into brand new clones. And finally, strawberry plants are actually a clumping crop. Starting in year three or four, you can divide up the crowns of a mother plant into individual plants and repopulate your entire patch that way. Let’s take a closer but brief look at all three starting with seeds.
Okay, I just gotta throw this out there: if you’ve decided to grow your strawberries from seeds, you gotta know that it’s by far the longest and most arduous path to a berry bonanza. The seeds sprout readily, but most strawberries set their fruit in the fall or winter prior to the next harvest, so no matter how early you get your seeds going, you are one to two years away from seeing any fruit. So yes, it can be done, but it rarely is. However, if you are going to grow your strawberries from seeds, there’s two things you need to know. One, cold stratifying the seeds prior to planting will greatly increase your odds of germination. This is how it would happen in nature, and strawberries are just one of those plants that really benefit from it. And two, all strawberries are hybrids. Collecting seeds from store-bought or even from your own patch could yield unknown results. Food for thought.
As for runners, which is where these guys were taken from, getting them early enough and getting them established can give you great results. Not necessarily in the same season just because there’s usually not enough time, but for sure the next year. If I’m collecting runners to start new plants, I simply cut them off as soon as the white root nodules appear on the bottom. You can either put them in water and wait for more roots to develop or plant them up in soil right away. And in fact, it’s always a good idea to cut the runners off anyway. They’re a massive drain on the mother plants. So even if you don’t want more strawberry plants, it’s a good idea to remove them as soon as you see them. Think of strawberry runners like you would the suckers on a vine tomato. Same idea. And finally, we can get oodles and oodles of new strawberry plants simply by dividing our older ones. And this is good. You see, strawberry plants may look large, but they’re, in fact, a grouping of many individual plants. And they’re all just in there jam-packed together, which is a problem because within a period of time, usually about five years, sometimes less, a strawberry patch or bed will become way too crowded. It’s gonna start to compete with itself, and it’ll start to decline. It’s why years three and four are usually the most productive for any strawberry plant or patch.
No matter which way you propagate your strawberries to begin with, the clock is ticking. Yes, they are perennial, and yes, they are extremely low maintenance, but right from the time of planting, the timer is set for the longevity of the crop. As you can see, all three methods of producing strawberry starter plants get you to the same point: planting up a container for patio growing, as well as a raised bed for maximum production.
Alright, so this is the point that many of you guys are at right now: plants in hand, ready to go. Let’s go ahead and look at the techniques for planting, including spacing, depth, and care. For most of you guys just starting out, you’re either going to have small pots that you made yourself or local tried and true favorites that you bought from the store. For the lucky individuals that have access to specialty nurseries or seed houses, you may have some bare root examples as well. Each of them is planted the exact same way, but before we get to work, let’s quickly discuss the two types of strawberry plants that you’re going to come across.
Visually indistinguishable by the plants and foliage itself, the two types of strawberries differ in their fruit production. On the one hand, we have June-bearing varieties. They produce one large summer crop of berries. These guys form buds in the fall for the following year’s harvest. On the other hand, we have ever-bearing strawberries. Ever-bearing strawberries produce once in the spring and then again later on in the summer. If the temperatures are warm enough, they may even produce a third crop early fall. A third type has arisen from older ever-bearing cultivars, and it’s known as day-neutral. These types of strawberries are going to grow and produce for as long as the temperatures are between 40 degrees Fahrenheit and 90 degrees Fahrenheit. Day neutrals can grow big berries, and they’re often grown as annuals, dug up, and then replanted the next year. Regardless of type, the spacing and planting are the exact same.
I know this container looks awesome, but let’s start off with the raised bed first. Strawberries are shallow-rooted plants, requiring only about five to six inches of soil depth. More is better, obviously, for water retention, nutrient availability, and room to grow, but more than six inches is kind of just a waste. This is the bed that we’re going to use for our new strawberry patch today. It’s an eight by two by one bed that last grew corn and right now is growing an excellent crop of strawberries.
Strawberries are like most plants in that they hate to compete, especially with weeds. Plus, this is no way to start a new patch. So let me go ahead and prepare the bed. Okay, while we’re cleaning up and preparing this bed, let’s talk a little bit about planting strawberries. Strawberry plants are very hardy; they can be planted early spring as soon as all danger of frost is passed and the ground can be worked. As far as location, like we said, they need full sun to perform their best, six to ten hours a day is what you’re shooting for. Drainage is key. We know that standing water is going to kill your strawberries, which is also kind of the tricky part about strawberries, in that they need constant moisture, especially during the berry-producing season.
So with that, soil, yes, drainage is key, but they also enjoy high organic matter content, and they want this for two reasons: one, for water retention, which is great because that helps us out with the moisture, and they need it for nutrients. After the bed is cleared and before I start planting, I’m going to amend heavily with compost. This is going to take care of both of those things. Compost is great, and for many of us, it’s free. Not only is it going to add nutrients and organic matter to our strawberry bed, it’s also going to add beneficial bacteria and microbes to the top active layer of the soil. I screen out the big bits and then I apply a nice level skim coat to the bed to finish off the prep.
That was a fair amount of work, but it had to be done. And now that our bed is cleared and ready, it’s time to start planting our strawberries. Planting strawberry plants at the right depth is the real key to their success, much more so than a lot of our other crops. We want to completely cover the roots, obviously, but the crown of the strawberry plant itself cannot be buried. It just sits there right at the surface. If you’re planting starter plants like we’re doing here today, the process is simple because you can simply keep the same depth that it’s already at.
Let’s do a few so I can show you exactly what I’m talking about. Start by making a hole slightly wider than your current strawberry pot and a little bit shallower. Place the plant in the hole, push down firmly, and backfill in. That’s it. With the right bed prep, planting each strawberry plant should only take about a minute or less. Try to transplant your strawberries on cool, cloudy days; you really want to avoid desiccation or any chances of transplant shock. Easy stuff.
Having your young strawberry plants as self-contained bundles of soil really makes the process of putting them out in the garden pretty simple. Bare root plantings, however, can be a bit trickier, but it’s not at all difficult. Just make sure to keep the crown above ground and hold the plant in place with one hand, backfilling with soil with the other. After doing a couple, you’ll get the hang of it.
As for spacing, strawberries are crawling, sprawling plants. They may look small now, but they spread like crazy. Give them 8 to 12 inches between each plant minimum, as well as 4 inches from the sides of the beds. New crowns and runners are going to quickly fill in the gaps. You can plant them in nice, neat parallel rows, but to get more plants in a given area, I always zigzag mine. As well, you might also notice that I’m adding in a bit of potting mix when I’m planting these guys up. It’s not necessary, but I had some leftover and it’s a nice boost for the plants.
After planting, the next thing I always do is to mulch, especially strawberries. It’s the key to locking in that moisture, preventing erosion
, and keeping the soil temperatures moderated. Mulching is going to help you produce the best strawberries. They’re called “straw”berries for a reason. After mulching, the next thing you want to do is a good watering. Really soak those plants to consolidate the planting. You want even moisture levels between the root ball and the soil around them so when those roots go looking for new moisture, they can do so without any speed bumps.
Alright, that’s our new strawberry bed all planted up. Start to finish, let’s move on to containers. Container strawberries are even easier, with your only concerns being pot size and the soil. To start off, aim for a 5-gallon pot size or larger and at least 8 inches of depth. Use a quality potting soil designed for containers. Store-bought works fine, but if you have the resources, making your own can be even better.
Start with a half compost, half coconut fiber blend, and add in some perlite or vermiculite and a small amount of amendments. Making the perfect strawberry mix is very easy. Whenever you’re using pots on the smaller side, a single healthy strawberry plant right in the center works perfect. For larger pots, though, observe those spacing rules that we did before with the raised bed. If you do intend to replant your strawberries every year, you can space them a little bit tighter. Make sure the container has really good drainage, and a little bit of mulch on top is even more beneficial than when we’re gardening in a raised bed.
Let’s go ahead and get these last three strawberries potted out. I’m using 7-gallon fabric grow bags, and at this size, with the proper care, these plants are going to last in the maintenance-free for about 3 to 4 years. I fill the pots right to the top with a quality organic potting mix, but I don’t plant them right away. To minimize transplant shock, I soak the pots for about 2 hours from below to make sure that the receiving soil is good and moist. This makes the planting so much easier.
Once I know that soil is good and moist, I make a depression a little bit bigger than the pot, I place the strawberry plant in the center, and I plant them up the same way we did before with the raised bed. Add in a nice thick mulch layer, and we’re all done. We don’t even need to water.
Okay, with our bed and containers all planted up, our focus turns to growing the best strawberries. And to do that, we need to look at their maintenance. Fortunately, strawberries are very low maintenance. In a full sun, low wind setup, your biggest task is going to be ensuring adequate moisture without overwatering, like we did when we initially planted them.
For pots 10 gallons and under, I recommend soaking them from below for about 4 to 6 hours during the summer months. This is going to do two things: one, it’s really going to let that soil soak up and hold as much moisture as it possibly can, and two, it’s not going to constantly flush out nutrients and wash the soil of its goodness like top watering does. Soak it from below, and you’ll know your strawberries will never dry out.
For winter, because your strawberry plants have gone into a state of dormancy, they don’t really need any water at all. And for spring and fall, there’s really no set schedule; you’re going to have to refer to your local climate and weather for that particular season. Keep them moist but not standing in water, and you’ll do okay.
I’m always hesitant to suggest a defined watering schedule for any crop. Every climate and every soil type is different. There isn’t one worldwide, universal watering schedule for any crop, let alone strawberries. Both overwatering and under-watering can have negative effects on your plants. Try to reach that balance. Mulch really does help to moderate the water loss, and don’t underestimate the importance of a high organic content; your soil’s ability to grab and hold onto moisture is just as important as how often you water.
Even more so, I would suggest. Having said that, your strawberry plants will drink up more moisture during the fruiting season, so right before a harvest, really watch those moisture levels. The last thing you want is dehydrated fruit left on the plant before you even get a chance to pick it.
And all this talk about water is going to make your plants very hungry. Make no mistake, to get the biggest berries and the best harvests, we’re going to need to fertilize our strawberry plants. And more so than any other plant I’ve grown, how much and when you feed is the key.
There are two times in the entire year to feed your strawberry plants for the best results: once in the spring and then again in the early fall. If you leave the first fertilizing too late, the plants won’t have the boost they need to produce the biggest harvest, and not to mention, the berries could become soft, mushy, and not taste nearly as good.
Once winter dormancy is broken, I wait about two weeks and then I fertilize. Or if you’re just starting a new patch like we did here today, I wait until about three weeks after planting. Give those new plants a few weeks, and then feed on the second or third watering. As for what to feed strawberries with, you want to go for a balanced blend, something that has an even number of NPK, the three numbers you see on every commercial fertilizer: 10-10-10, 5-5-5, 3-3-3, whatever it is, just make sure it’s balanced.
For me, I go with organic liquid feeds and just dilute to the manufacturer’s specs. Water the roots, not the leaves, especially when fertilizing strawberries. Now, some people do fertilize container strawberries a bit more often, maybe two or three more times per year, and I don’t disagree with that practice, but if you are going to do that, make sure to stop fertilizing them at least three weeks before a harvest.
The spring feeding is pretty self-explanatory; we want to get the plants as big and established as possible so we can reap those harvests. But don’t discount that fall boost. After you pick that last strawberry, the plants are spent. They really worked hard for us to produce that berry bounty, so they need a little vitality given back. It’s really going to help them as they’re about to enter another long, hard winter.
Two feedings: early spring and early fall, it’s that simple. What isn’t simple, however, is the sheer amount of information we covered here today. Let’s recap and go over the finer points so that we don’t miss a thing.
Strawberries are cool climate crops, producing delicious berries in the spring, summer, and sometimes fall after a winter dormancy. They’re clump-forming plants that can be started by seeds, satellite runners, or by division. There are three types of strawberries based on their fruiting habits: June-bearing, ever-bearing, and day-neutral.
June-bearing usually has one large crop all at once. Ever-bearing will normally fruit twice for you, and day-neutrals will keep going if the temperatures are warm enough. Although they are perennial, strawberries don’t last forever and they must be dug up and replanted every 3 to 5 years. Strawberries need full sun, six to ten hours a day minimum, and they love moist soil but only when it’s not too wet. If the strawberries are grown in a pot, they’ll probably need a little bit more water than those grown in a bed. Mulch really helps to maintain soil moisture, keeps the berries clean, and prevents erosion.
Strawberries are extremely shallow-rooted plants, requiring only about 6 inches of good soil depth, but they can spread like crazy. Strawberry plants like lots of room, so planting them 8 to 12 inches apart will give you the best results. Planting is a simple affair, just make sure to bury the roots and not the crown. Also, make sure to water the roots and not the leaves.
Strawberries are heavy feeders and do need a balanced fertilizer to give them the energy to produce large, healthy berries. Two feedings per year: one in the spring and one in the fall, and if you do fertilize your container strawberries a little bit more often, just make sure to stop feeding them at least three weeks before the first harvest. One more thing: always check with your local county extension office or garden center for planting and care tips that are specific to your area. It will save you a lot of headaches.
Alright, so you got all the good info you need to start and maintain your own strawberry patch. For my gardeners in the north, just remember: it’s not too late to get started. You’ve got some time before those first fall frosts come around. Good luck and happy gardening.
This article provides an extensive guide to growing strawberries at home, covering various methods of propagation, planting techniques, maintenance, and care tips. It emphasizes the importance of proper soil, sunlight, watering, and fertilizing for successful strawberry cultivation. The article also discusses different types of strawberries based on their fruiting habits and provides detailed instructions for both garden beds and container gardening.