Dear plant lovers,
I just thought I would describe you my technique for rooting Nepenthes cuttings.
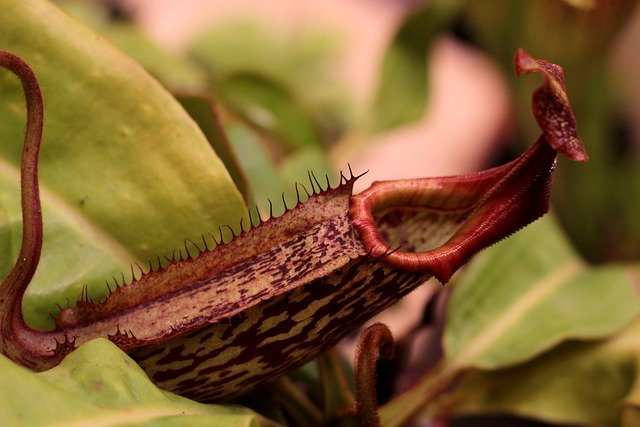
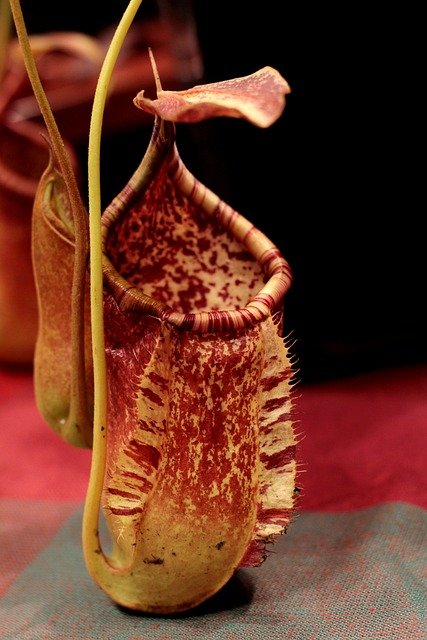
This is a piece of my Nepenthes ‘Linda,’ which is a cross. It’s a really nice Nepenthes, and it’s quite happy growing in a house. It produces traps that are about nine inches tall, if not a bit bigger, and it grows quite vigorously. This is a piece of one of the main vining sections that was about a meter and a bit tall, and I’ve taken off about three-quarters of a meter.
What I’m going to do with this is divide it up and take these cuttings. Usually, I take cuttings at one or two nodes, or two or three leaves, so you want a nice long bit of stem. We’re going to cut it just above the previous leaf joint—I’ll count one, two leaves, then cut it again, and then after another couple of leaves, cut again. From this piece, I’m probably going to make about six or seven cuttings.
This is a technique I use that’s worked quite well—I get rooting rates of probably eighty percent or more, so I’m quite happy with it. It doesn’t actually cost a great deal to do it. I’m just cleaning off the end here with a sharp pair of secateurs, and then I will basically cut it up. I’ll try and leave as much as I can below the next leaf so there’s plenty to go in the ground and start rooting from.
Usually, when these things root, they will root from within the leaf node. They will also sprout new growth from within the leaf node, usually at the bottom one, but sometimes the top one. It’s easier if it’s at the bottom, but the top is okay too. If I cut this one off about here, there’s still room for it to actually spread out above that.
I’ll shorten some of the leaves a bit—we don’t want the tendrils on here as they actually get in the way when you’re trying to keep them somewhere to root. Some people shorten them to halfway; I’m happy to do it to about that much. These will quite often die back, and sometimes they die back completely, but they’ll still sprout.
I’ve even had success with bits of brown stem that look like dead twigs—I’ve stuck them in the compost I’ve been using, and they have sprouted on occasion. So it does work quite well.
Now, the technique I watched online involved taking the cutting and splitting the stem. Take a nice clean knife, and I’m going to go about halfway across the stem and split it up for about an inch and a half, maybe a little less than halfway. Carefully slide the knife up, minding your fingers, and what this does is give more area for roots to start forming. If we just cut it at the bottom, there’s a relatively small area where roots will grow, but if we split it, the roots can start to grow from within all that cut area.
Next, I rotate the stalk by 90 degrees, and I don’t cut a complete slot up it. Instead, I slice the outer part of the stem, almost like the bark, on the other sides. Then, I carefully lift the outer part of the stem away from the actual stem itself, which increases the area from which roots can grow.
To keep the cut open, I use a bit of sphagnum moss. I nip off a piece, fold it over, and carefully push it into the cut to keep the stem open.
The technique I saw involved wrapping the cutting in sphagnum moss and putting it in a pot, but while this worked for rooting, it was a pain to pick the sphagnum moss from around the roots later. The sphagnum can turn to mush and keeps the roots too wet, so I prefer using a more open compost instead of sphagnum.
I use perlite for rooting—it works well, it doesn’t inhibit the growth of mold, and it’s freely draining but holds enough moisture for the cutting to root. I fill a recycled pot with perlite, damp it a bit to make it easier to form a hole, and carefully place the cutting in it. I bury it fairly deep, almost up to the next leaf node, which is where I hope it will root and sprout.
I’ve had about 89% success with this method. The first ones I did, I placed in propagators in my greenhouse, but now I just keep them on a windowsill without even bagging them to maintain humidity, and they root quite happily.
Finally, I carefully pick away the perlite when it’s time to check for roots, as the early roots are very delicate. The cuttings can take one to four months to root, so patience is key.
Now, I’ll show you an example of a Nepenthes alata cutting I potted up in perlite. It is sprouted and has nice little black roots. I pot it up in my usual mix—peat, orchid bark, chopped sphagnum moss, and perlite—which works well for Nepenthes as it doesn’t retain too much water.
If you have any other techniques for rooting Nepenthes, do let me know, especially if they are 100% successful. Happy Gardening.