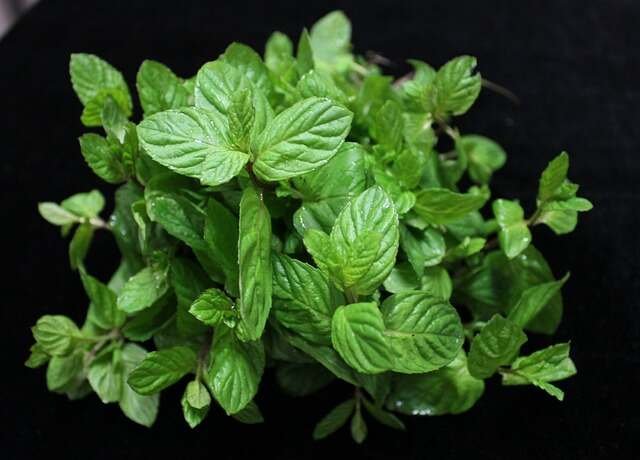
Hi, I love growing mint in the garden. I suggest that you grow it too if you’re not already doing so. It doesn’t matter if it’s peppermint like this one or spearmint or chocolate mint or pineapple mint. There are so many to choose from that offer great benefits both from a culinary perspective and also from a garden biological balance perspective.
I love few things more than just to walk by my mint plant, brush it, and just breathe in that aroma. It’s so invigorating and really makes it enjoyable to be out in the garden. But for all its benefits, it does have a dark side. It spreads so quickly because it can grow so easily that it can easily take over your garden. If this hasn’t happened to you, you probably know a gardener who has had that problem.
That’s why I grow mine in a container. I keep it within a single space so it can’t escape. And by growing mint in a container, you can have beautiful plants, and it produces a harvest for most of the growing season. Mint grows best in a location where it gets full sun for most of the day. It can handle some shade, but it’ll do better in the sun. And it really likes a rich, well-draining soil, but that soil should stay evenly moist. Mint is one of those plants that doesn’t do as well in dry soil, so rich moist soil in sun is really what you want to try to accomplish when you want to grow mint.
You can start it from seed, but that can take a while. The best way is to buy a plant or to dig up a plant or get some cuttings from someone you know who has mint. And that’s what I did to start my new mint bed. My brother and sister-in-law had a space that was becoming overgrown and invited me over to dig up some of their plants. The roots don’t run too deep, and so it’s a simple matter of just loosening the soil and pulling the plants out.
As I pulled the plants out, I put them in a bucket that I brought, and in the bucket, I had just a normal potting soil. I wanted to get the roots and the plants back into soil as quickly as possible. And then, as with any transplant, I watered well to keep the soil moist while I transported it from their garden to my garden. I did this a year ago. I had this bed all ready to go in place. I just needed to put the plants in. So let’s do a flashback to a year ago with a younger Gardener Scott telling you how I planted these.
Mint is a pretty tough plant, but all plants are stressed during the process of transplanting. So I dug up all this mint when it was later in the day and overcast. And now I’m putting it into this bed again later in the day and it’s overcast. Without the harsh sun, the transplants will do much better. I had it in a nice protected area overnight. It’s mostly been in the shade today. So as I put it into the ground, it should have less transplant shock because I cared for it before I just stuck it in the ground.
I’ll start by removing some of these pieces that I put in the bucket yesterday, trying to bring up some soil along with the roots. The soil in this bed is pretty evenly moist, so I’ll start by digging a relatively deep trench. That way, I can lay the plant deep into the trench and then cover the roots with soil. For smaller individual plants like this, it’s just the same idea: just a smaller trench, laying it down, burying the roots, and firming the soil around the plant.
And the roots for individual plants like this, I can just do an individual hole and bury it. It’s okay if you have some smaller plants with long roots to not plant them vertically but instead to plant them at an angle. If their stem falls to the side and touches the ground, there’s a good possibility that it might root along the stem. That’s one reason why mint is so invasive. When it falls over, it just keeps on growing. You can use that to your advantage to help fill a bed if you just have very small plants. If you’ve got bigger, thicker ones, I’ll put them in vertically and again maybe bury the stem a little bit. Just try to get them in the ground as quickly as possible so that you don’t have to worry as much about stressing the plants during this transplanting process.
This is one plant main root comes down , and it splits off and at various points along this root, you can expect that other stems will start popping up. With all the plants in, I’ll water very well so the soil settles nicely around the roots, and to help hold all the nice soil moisture in, I’ll mulch lightly with some crushed leaves and dried grass. And then I’ll just wait for all of this mint to perk up.
Just two days later and the plants have fully recovered. Spring is a great time to get your mint plants in the ground because then you can enjoy them throughout the entire growing season. But even with a fall planting, as long as you give a few weeks for those roots to get established, this hearty, durable perennial should be able to last through the winter. In my zone 5b garden, they just shrugged off the layers of snow I had over a period of weeks that completely covered these plants, and then they bounced back in the spring looking gorgeous. If you live in zone 8 or above, they may never die back in winter, and you may actually end up with an evergreen crop that can be harvested all year.
I put these plants in in early summer, and in those early days, I had to water a couple times a day to keep the soil from drying out and to get those plants established. But once they start actively growing, I have a very dry environment, and I’m only watering these plants every two or three days after I check the soil moisture and see if they need water at all.
Mint is a bit unique in the garden because you can begin harvesting it as soon as the leaves appear. In fact, the more you harvest it, the bushier it will get. Depending on how much you need, you can harvest individual mint leaves and just take these into the kitchen and use them for whatever purpose you want. I prefer to pinch off the top of the mint and actually take in the whole top of it. And when you do this, you’ll actually encourage the growth and make the plant bushier. That’s because if you look at the leaves at the node where the leaves are coming out of the stem, there are other little teeny leaves just waiting to grow into new stems and branches. Pinching off a few leaves or the tops of the plants is great for a daily harvest for use in salads and beverages. But if you do like I do, which is grow mint and then dry it to make mint tea that you can enjoy throughout the year, you can get in here and prune.
it pretty drastically.So I’ll come down to the base of the plant and actually cut out the whole thing. And when you do this, you’ll be able to see that there are a lot of new mint plants that are growing from the soil. This will really reinvigorate like you want to reinvigorate mint. But a lot of these young plants at the very bottom will now take over and give you some really good growth. Without this pruning, these are all covered up and not getting any sunlight.
It’s best to do this before the plant flowers and allow the younger plants to grow. By following this cycle, you can easily get three, maybe four, complete harvests during the growing season.
And now I’ll just take these mint plants inside, hang them upside down, and allow them to dry. And I’ll use them in tea later on. Now, Lily decided to join me, so right now, we’re going to go in and do exactly that.
You don’t have to harvest all of it all at once. Just do as much as you feel that you need. I actually like letting these go to flower. They attract a lot of the beneficial insects that I want in my garden. When these flower, it’s beautiful, and the bees end up covering all those nice little purple flowers. Be aware that if you let the mint flower, there is the possibility that those seeds can drop on the soil and sprout and spread throughout the rest of your garden. So you might want to cut them off before the seeds mature or the next couple years just keep a close eye on the ground and pull up any seedlings that might emerge. And also, because these roots spread so quickly and so invasively if you grow them in a container pretty soon the containers not going to have any more room for new plants. So every year or two it’s a good idea to go ahead and get in and dig up the plants. You can add new fresh amended soil. You can give away some of the plants, but it really helps to reinvigorate the bed so it doesn’t get clogged up by all of these plants.