Arugula, you either love it or hate it; there’s no in-between. But if you’re reading this article today, chances are you love it as much as I do. It’s pricey as heck to buy, there’s nothing I can do about that, but it’s super easy to grow, especially indoors, any time of the year. Let me show you how.
Arugula is a salad green that is actually a member of the Brassica family. However, unlike its traditional cousins broccoli and cauliflower, it’s not grown for its fruiting structures. Because arugula is only grown for its lush green shoots, coupled with the fact that it’s a super quick grower, makes this delicious herb an unbelievable indoor crop. Let’s go through the steps that I do to grow the fastest, tastiest, most lush indoor arugula imaginable.
Soil:
Growing herbs indoors all starts with the soil and the container. Arugula doesn’t have a massive root system, so any container four inches tall in any size that you prefer is gonna do just fine. You can use any pre-made plastic, ceramic, or clay pot; heck, you can even use Tupperware. But today, I’m gonna make my own mini arugula planter using just this four-foot cedar board. Whatever container you use, just ensure that it can drain water. Wet, soggy roots go anaerobic quite quickly, and in no time flat, that could spell death for most herbs, including arugula.
The planter that I’m making today is going to be a little bit on the tall side, but that’s because I want to fit more soil into it. I want to fit more soil into it so I can enable my arugula to have multiple harvests. More on that later, but in case you’re wondering, that’s why this herb planter is sized like it is.
For soil, let it be known that arugula isn’t very picky at all. Most rich compost-based neutral pH indoor potting mixes are gonna do just fine. I’ve really been having a run of bad luck lately with store-bought soils and pests such as fungus gnats, so I’m going to make my own soil mix for this batch of arugula. I start with a 50/50 blend of my own fertilizer and coconut fiber for certain materials, for example, hay feast, canola dinner, rock dust, rock phosphate, and even Epsom salts. You don’t need these things to grow a fantastic indoor arugula crop, but once you supercharge your soil like this and see the results, it’s hard not to. These amendments are most certainly not expensive, and the quantity that I’m using here should only cost you about a dollar or less per batch of soil. For me, the total volume of all the amendments combined in equal amounts comes to less than 10% of my total soil mixture. Mix it thoroughly, and you’ve just made a potting mix that is 10 times better than anything you could buy.
Planting:
I like to line the bottom of all my pots and containers with brown recycled paper. This will allow the water to escape the planter but not the soil, kind of like a coffee filter. Planting arugula is quite simple. Fill up your pot or container of choice all the way to the top, then compress it down about an inch. This creates a nice level landing pad perfect for planting arugula seeds. Seeding density varies on your planting purpose, as arugula can be grown as either a microgreen or a full-blown salad green. Today, we’re going to be growing our arugula all the way, so our seeding density is about two to three seeds per square inch. If you’re going for microgreens, densities call for up to 21 seeds per square inch, so around 10 times the density. Once you’re happy with the seeding, cover them back up with no more than half an inch of that same potting mix. Arugula grows great in cold weather. However, like most seeds, its optimal germination temperature is actually higher than its optimal growing temperature. Aim for a range between 15 and 20 degrees Celsius to really hit that max germination rate. Indoors, this really shouldn’t be a problem, as that’s around room temperature. However, the warmer temperatures, coupled with the shallow planting depth, causes one immediate problem, and that’s the drying out of the top layer of soil. This is obviously no good for germination, but fortunately, there’s a simple solution, and I’m always about the simple solutions. I grab a single sheet of paper towel and fold it to the size of the width of my pot. I place it right on top and thoroughly wet it down. This will not only keep the moisture locked into that top layer of soil, but it’s also going to allow us to water in the future. We can now top water without worry of blasting that soil everywhere.
Harvesting:
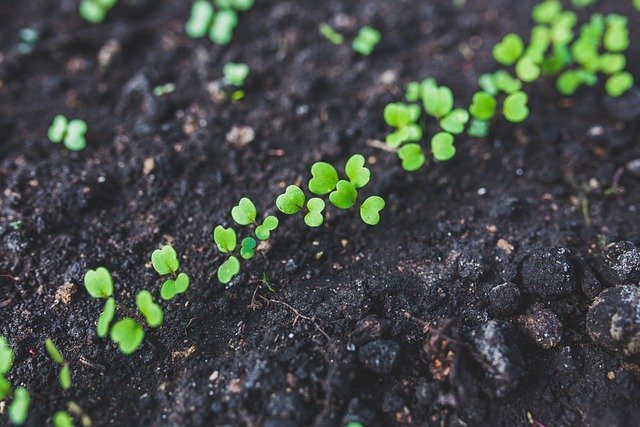
Within three to five days, arugula will sprout up with vigor. Here at day five, you can already see that the seeds have not only sprouted but they’ve also pushed up that paper towel protector up over an inch. Amazing. At this time, remove that paper towel and allow those shoots to grow. Arugula doesn’t need a crazy light setup to grow properly, but it’s most certainly not going to say no to a nice sunny windowsill. At room temperature, you may need to water once every other week, but don’t overdo it. No sense washing out all those lovely nutrients that we put into our soil. Within three weeks since germination, four weeks since planting, we can now look at harvesting our arugula. There are three ways to harvest this perennial green. You can simply pull up all the shoots and cut right where the green meets the white. Once you do that, the crop’s over, and you’re gonna have to start again. But where’s the fun in that? Early on, such as right now, you can harvest a second way, and that’s to selectively cut the largest shoots with a max of a few leaves per plant. Leave the rest of the plants to grow. Later in the life cycle, you can actually cut up to one-third of the whole top of the plant off in a mass harvest. Amazingly, the arugula crop is going to grow back for second and third harvests, no problem, even indoors, even in small containers like this.
Growing arugula indoors is one of the more rewarding gardening endeavors that we can do. It really is super easy, and it’s a fun project to do with kids because it grows so fast. And not only that, anytime you can grow something like this right at home, you become a little bit more self-sufficient, and that’s a good thing.